
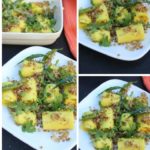
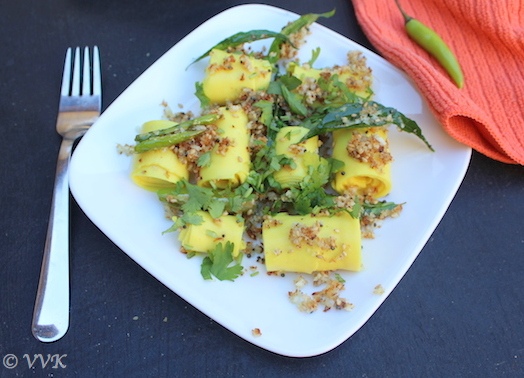
These bite-sized popular Gujarati rolls – Microwave Khandvi – are prepared with besan and yogurt. I cooked down the mixture to thick paste, spread thinly across a flat surface, rolled up to bite-size pieces and then tempered with spices. Delicious!
Khandvi vs Dhokla
If you notice, the ingredients of khandvi and dhokla are pretty much the same except that we use yogurt for Khandvi.
But the cooking process is completely different. We prepare the khandvi mix with besan and yogurt.
I and Khandvi have had a lot of Neeya Naana (literally it means you or me in Tamil, actually it’s the title of the popular Tamil debate show) moments. Even after all the khandvi research, somehow I screwed it up every time. I can write up to 3 khandvi disaster blog posts, but I never gave up. Luckily I didn’t have to fight like Ghajini, I was able to prepare and roll khandvi in my 4th attempt.
But today I sharing my 5th attempt. The clicks are from my 5th attempts. Instead of sharing the disasters in the notes section, let me proudly share it here. ;-)

My Cooking Attempts
Attempt 1
Thought of trying the stove top method and started cooking the besan mix under high flame. But I overcooked and my besan mix became a stone mix. I couldn’t spread it at all. I then had to struggle cleaning the vessel.
Attempt 2
I gave up the stove top method and thought of trying microwave method. While preparing the batter, I forgot to add water. Just mixed yogurt and besan and started to cook the mix. The end result was again a stone mix and I couldn’t spread at all.
Attempt 3
This time out of over enthusiasm, added more water and didn’t cook long enough so as to prevent my mix from become stone mix. I was able to spread but then I couldn’t cut and roll. I waited and waited and waited for spread to dry. But no luck. ;-)
Attempt 4
I successfully prepared the khandvi and I was able to roll it. In this attempt I understood the proportion and that became my staple measurement.
Notes:
- The batter should be in semi-solid (thicker than dosa batter) consistency. And if you are trying in microwave, the time might vary as per your heat setting. So keep stirring the mix for every one minute after cooking.
- Coming to the spices, you can grind the green chilli-cilantro-ginger and add it to the besan mix as in Dhokla but if you want it mild, you can skip.
- As usual adjust the spices and salt according to your preference.
So without any further ado, here my khandvi recipe, tada..:-)

Ingredients:
For the Batter:
- Besan | Chick Pea Flour | Kadalai Maavu – ½ cup
- Yogurt – ½ cup
- Water – ¾ cup
- Hing – ½ tsp
- Turmeric Powder – ½ tsp
- Salt – 1 tsp
For Tadka:
- Mustard Seeds – 1 tsp
- Sesame Seeds – 1 tsp
- Grated Coconut – 1 tbsp
- Green Chillies Slit – 3
- Curry leaves – 1 strand
- Hing – ½ tsp
- Oil – 1 tbsp
- Chopped Cilantro – 1 tbsp
Steps:
- Sieve the besan.
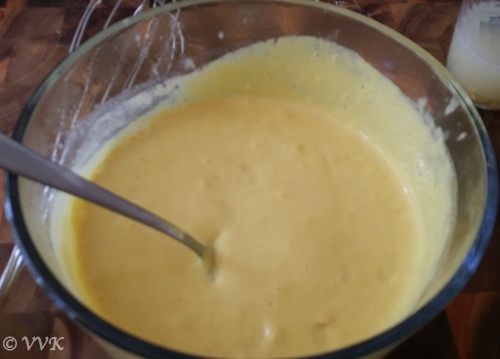
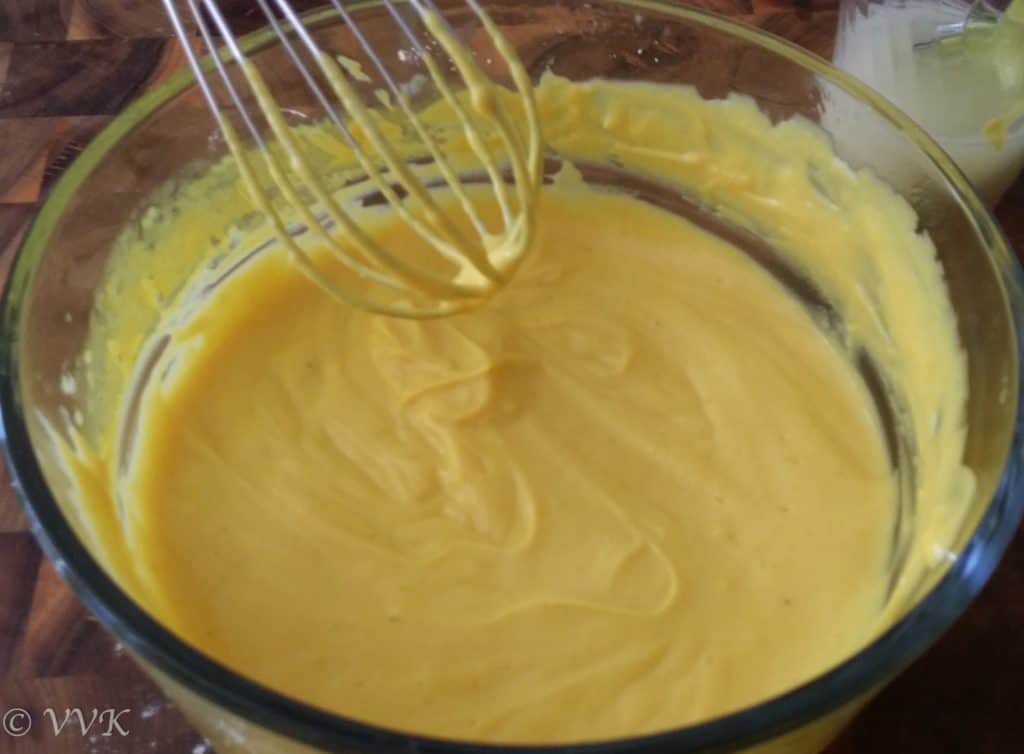
- Add the sieved besan, yogurt, hing, salt, turmeric powder in a blender. Add the ¾ cup of water and blend it nice and make sure the batter is lump free.

- Pour this batter in a microwave safe bowl. Check for salt and if required adjust accordingly. (The batter might not be yellow in color, but as we microwave it slow gets the yellow color)
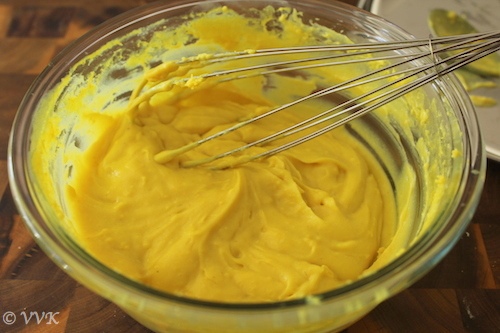
- Now microwave this batter for 1 minute. Remove it from the microwave, scrape the corners and whisk it nicely for another 30 to 45 seconds making sure there aren’t any lumps.
- Now microwave again for 1 minutes and remove it from the microwave and whisk it well again.
- Repeat this for one more minute. Basically after 3 minutes check the consistency. It should be semi solid. If its not microwave for 45 seconds to 60 seconds. I microwaved for another 45 seconds.
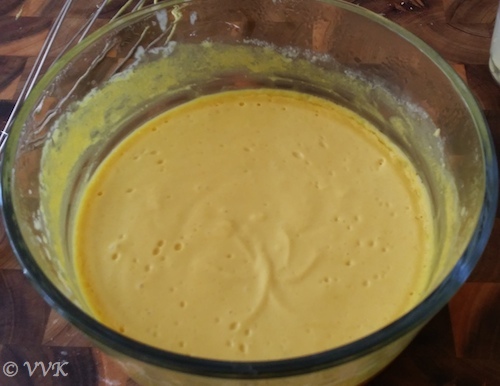
- Overall I cooked it for 3 minutes and 45 seconds in microwave, whisking it for every one.
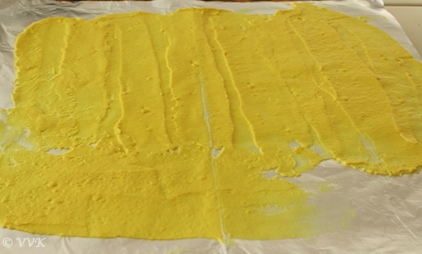
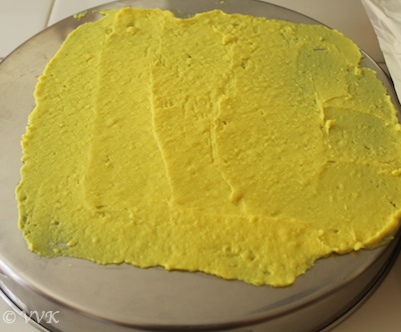
- To spread the batter, you can use plates, baking tray or silicone mat. I went with both aluminum foil and plates.
Next…
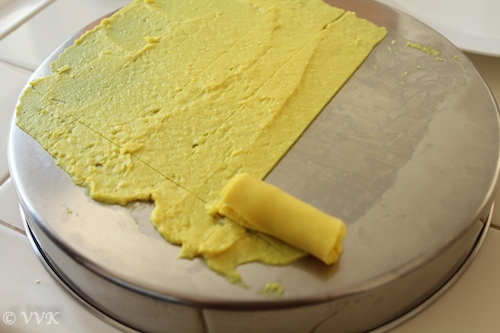
- Take a ladle full of cooked batter and pour in the foil or flat surface. Using a flat spoon like dosa flipper, spread it slowly and thin like below. You don’t need to spread it too thin. Repeat this for the rest of batter.
- Let it cool down for about 40 minutes.
- After 40 minutes, you can start rolling them up.
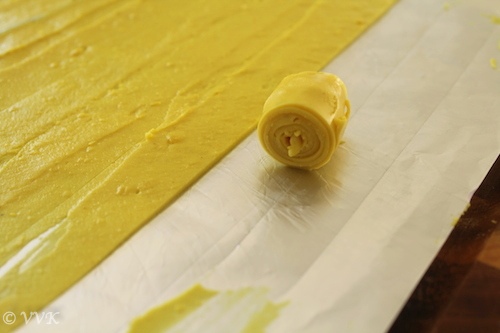
- You can cut the edges off using knife (I didn’t remove the edges) and cut them the spread batter into thin strips.
- Slow start rolling these thin strips like below.
- Repeat this for all the strips.
- After rolling, in a tadka pan heat the oil.
- Once the oil is hot, add the mustard seeds, sesame seeds, green chillies, hing, curry leaves.
- As they start to splutter, add the grated coconut and sauté for a minute.
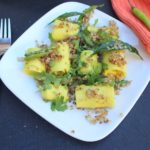
- Now add this mixture on top of the rolled khandvi. Also sprinkle the chopped cilantro.
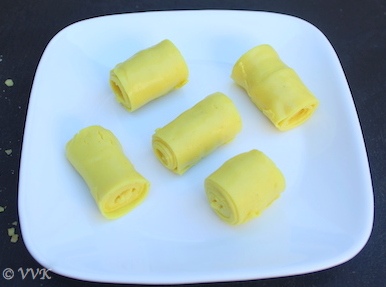
That’s it. Khandvi is ready. :-) Enjoy these bite sized rolls with green chutney.
Enjoying this Microwave Khandvi?
You will love these, too:
Have you made this recipe?
If you’ve made this Microwave Khandvi recipe, please share your photos with me on Pinterest, Facebook, Instagram, YouTube or Twitter – I will be delighted to see your results!
📖 Recipe
Microwave Khandvi
Ingredients
For the Batter
- ½ cup Besan | Chick Pea Flour | Kadalai Maavu
- ½ cup Yogurt
- ¾ cup Water
- ½ tsp Hing
- ½ tsp Turmeric Powder
- 1 tsp Salt
For Tadka
- 1 tsp Mustard Seeds
- 1 tsp Sesame Seeds
- 1 tbsp Grated Coconut
- 3 Green Chillies Slit
- 1 strand Curry leaves
- ½ tsp Hing
- 1 tbsp Oil
- 1 tbsp Chopped Cilantro
Instructions
- Sieve the besan.
- Add the sieved besan, yogurt, hing, salt, turmeric powder in a blender. Add the ¾ cup of water and blend it nice and make sure the batter is lump free.
- Pour this batter in a microwave safe bowl. Check for salt and if required adjust accordingly. (The batter might not be yellow in color, but as we microwave it slow gets the yellow color)
- Now microwave this batter for 1 minute. Remove it from the microwave, scrape the corners and whisk it nicely for another 30 to 45 seconds making sure there aren’t any lumps.
- Now microwave again for 1 minutes and remove it from the microwave and whisk it well again.
- Repeat this for one more minute. Basically after 3 minutes check the consistency. It should be semi solid. If its not microwave for 45 seconds to 60 seconds. I microwaved for another 45 seconds.
- Overall I cooked it for 3 minutes and 45 seconds in microwave, whisking it for every one.
- To spread the batter, you can use plates, baking tray or silicone mat. I went with both aluminum foil and plates.
- Take a ladle full of cooked batter and pour in the foil or flat surface. Using a flat spoon like dosa flipper, spread it slowly and thin like below. You don’t need to spread it too thin. Repeat this for the rest of batter.
- Let it cool down for about 40 minutes.
- After 40 minutes, you can start rolling them up.
- You can cut the edges off using knife (I didn’t remove the edges) and cut them the spread batter into thin strips.
- Slow start rolling these thin strips like below.
- Repeat this for all the strips.
- After rolling, in a tadka pan heat the oil.
- Once the oil is hot, add the mustard seeds, sesame seeds, green chillies, hing, curry leaves.
- As they start to splutter, add the grated coconut and sauté for a minute.
- Now add this mixture on top of the rolled khandvi. Also sprinkle the chopped cilantro.
- That’s it. Khandvi is ready. :-) Enjoy these bite sized rolls with green chutney.
Notes
- The batter should be in semi-solid (thicker than dosa batter) consistency. And if you are trying in microwave, the time might vary as per your heat setting. So keep stirring the mix for every one minute after cooking.
- Coming to the spices, you can grind the green chilli-cilantro-ginger and add it to the besan mix as in Dhokla but if you want it mild, you can skip.
- As usual adjust the spices and salt according to your preference.
- So without any further ado, here my khandvi recipe, tada..:-)
Nutrition
I am not a nutritionist. The nutritional information is provided as a courtesy and is an estimate only. It varies depending upon the product types or brands.

Wow thats some efforts and the final one has turned out to be a stunner!..great job there..As Suma said we did it the first time for ICC and it turned out good and never went back making it..I remember enjoying it so much though!..
Thanks a lot Valli. :-)
i too have my share of neeya-naana with khandvi!!! this looks like a winner!!
ha ha.. I blv all of us had our own neeya naana moments with this khandvi
Neeya naana!? Ha ha. Love this microwave version…have to try it asap
he he he yeah.. please do try Sowmya. Thanks
Wow, perfectly made Khandvi. Kudos for your patience. I made it few years ago and didn’t really get the texture, so gave up. Will have to try it one more time.
Thanks a lot Pavani.
As part of Valli’s Indian cooking challenge, I tried it twice on stove top. I got it perfect for the first time I think but asked my husband for the input and upon his suggestion cooked more and screwed up. The second time was also a disaster and I gave up never to try it again. And you are tempting me with this microwave version. Your perseverance has finally paid off in the former of that perfectly cooked khandavi.
Thanks a lot Suma. Somehow I always screw up the stove top version. Like this MW version.
Lol your efforts taught you quite a bit. Kudos for try try try till you succeed. Looks yum. I have one mw method that I have to try but you know me. :D
yup archana.. he he post yours soon. Thanks
Wow I love that you tried it so many times!! The final result looks perfect :)
:-) Thanks Smruti.
Khandvi is something I have not dared to try yet. After seeing yours, I am tempted to try some soon.
I know, I had the same issue. Somehow tried it and finally posted. :-)
Hats off to your perseverance. Awesome job, Srividhya!
Thanks a lot Harini.
Very nice! You mke it in the night for a ready breakfast?
Thanks a lot Suhasini and welcome here. I usually make it over the weekends for evening snacks.
I Love khandavi and never tried it bcoz afraid of rolling ? And your version looks super easy and boost me to try once..thanks sri for this beautiful share..Bookmarking ?
I had the same issue too. But everytime when I see them pics, I wanted to try. Please do try and let me know. :-)
Wish i get a plate of this beauties, my all time favourite Khandvi is just calling me..
:-) Thanks Priya
Love khandavi. And this microwave version looks super easy and mess free. Yours came out wonderful! :)
Thanks a lot Anu.
Priya @asmallbite
Beautifully rolled khandvi,hats off to your attempts…
Thanks a lot Priya
Nice and yum , well presented !!!
Thanks Alboni.
That plate of khadvi looks great. These types of failures make a great foundation for our future attempts. Kudos to you to have mastered the art..
Very true Gayathri. But I need to agree that I still have to improve a lot and I can refine this recipe a lot.
Perfectly rolled kandvi,looks yummy..
Thank you Nalini
Way to go girl!! Th fourth attempt has resulted in a beautiful khandvi!! I love this snack and sometimes it is tricky to get the right consistency of the besan. Great job!!
Thanks a lot Usha.. yeah that consistency was way to tricky.
Kudos to ur perseverance Vidhya ! there have been just 2 instance of neeya naana with this dish and after 2 futile attempts on the stove top, I gave up ! Great to see ur microwave method and I will surely try this proportion :) this looks great !
errr glad that I am not the only one to struggle with khandvi. Please do this Kalyani. Just adjust the MW timings alone.
Pinned!! This is something that I always wanted to try but was intimidated for the same reason as you!
Give it a try yaar.. The time alone varies according to your MW settings.